Important!
The documentation on this page covers Hera for VirtueMart 3 and will be updated for Hera 4 soon. There are many options or features that have been removed or changed in the new version.
Here you can find detailed information about the installation, configuration and special features of Hera VirtueMart template. Use the menu on the left side to quickly navigate to the documentation's main sections.
Template installation
To install the template :
- Login to Joomla administration area.
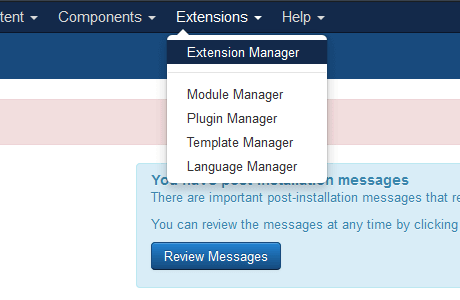
- Go to "Extensions -> Extension Manager".
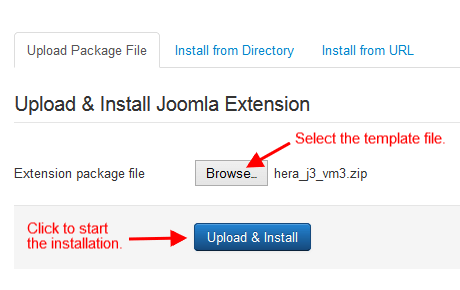
- In the "Upload Package File" field find the template file that you downloaded from our web site and hit the "Upload & Install" button.
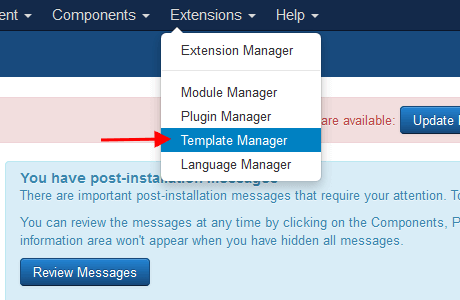
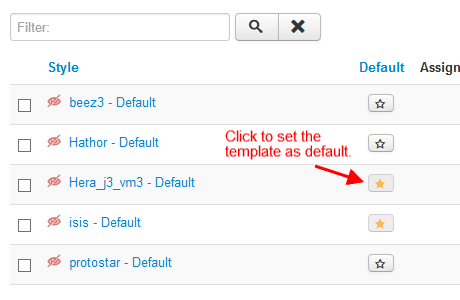
- Go to "Extensions -> Template Manager" and set the template as default.
Updating the template
FIRST BACKUP YOUR TEMPLATE FILES
The update process is simple, you just reinstall the new version over the existing and after that replace the favicon with your own. The installation will not overwrite the custom.css and custom.js files so your code changes will remain intact.
In case you had modified any template files, you will have to replace the new files with the modified or redo the modification to the new files.
Quick start package installation
To install the quick start package follow these steps:
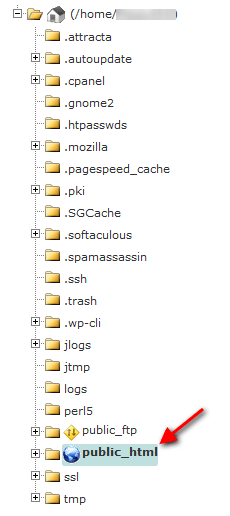
- Upload the hera_j3_vm3_quickstart_v3.xx.x.zip to your server's www root folder (public_html on Cpanel servers).
- Extract the file.
- Open your favorite browser and type your domain name.
- The quick start installation page will appear.
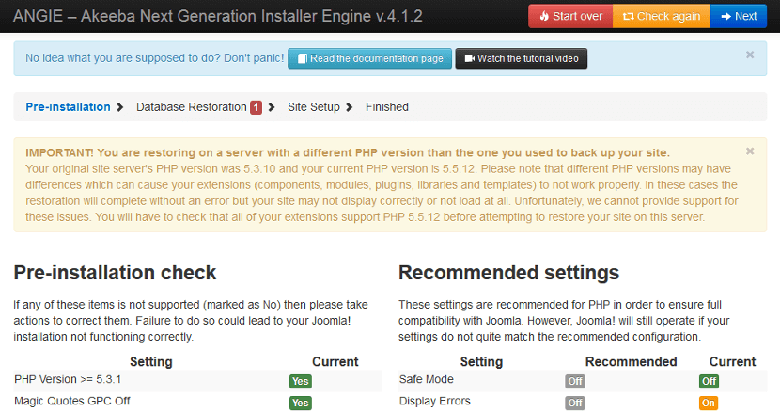
Before installing on a live server you should first create a database and a database user because the installer will ask for this information.
Template logo
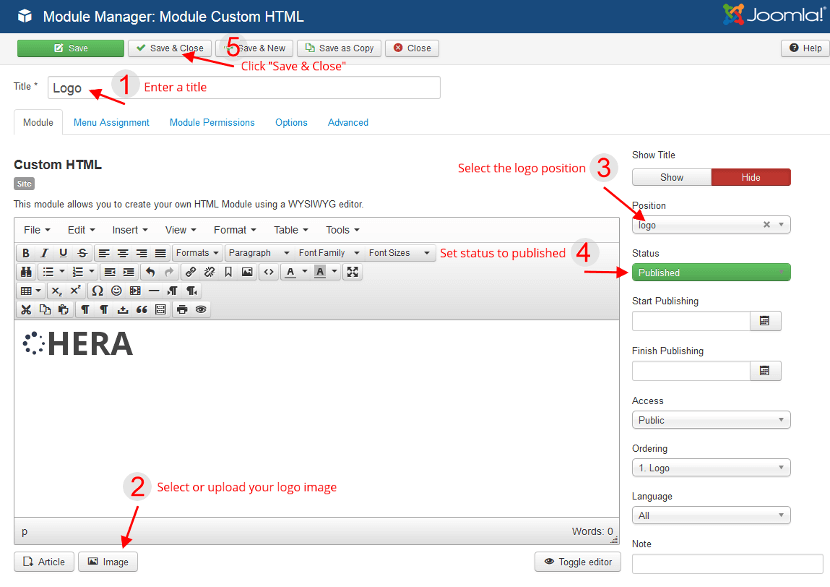
To set up the template logo you must create a Custom HTML module and publish it on the "logo" module position:
- Enter a title for the module.
- Insert your logo in the editor text area.
- Set position to "Logo".
- Set "Status" to "Published".
- Click the "Save & Close" button.
Template menu
In order to display the main menu find your desired menu module, set the position to "menu" and select "YES" in "Always Show Submenu Items".
The module caching must be disabled or else the mobile menu will not display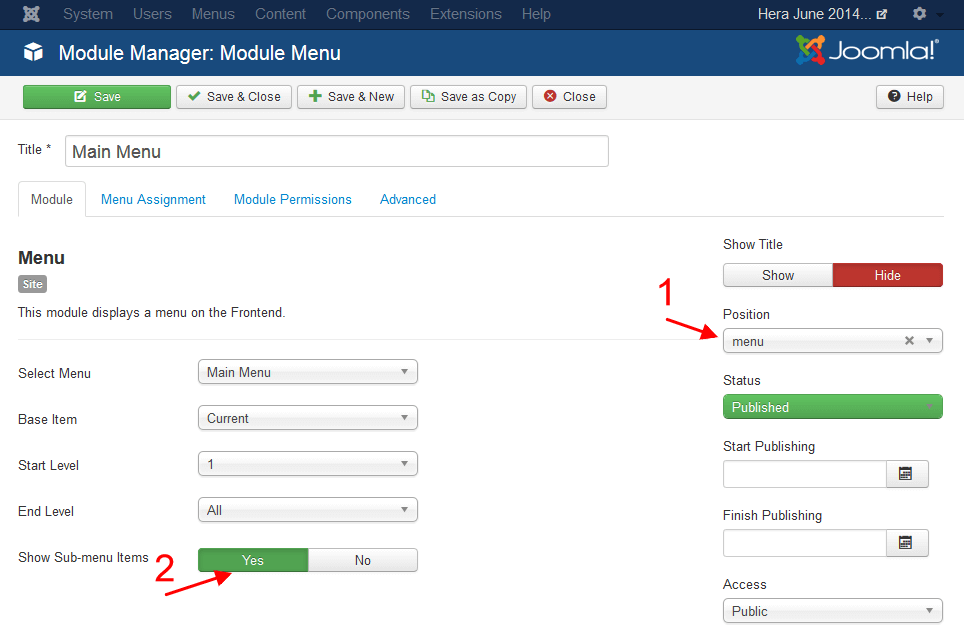
Template styles
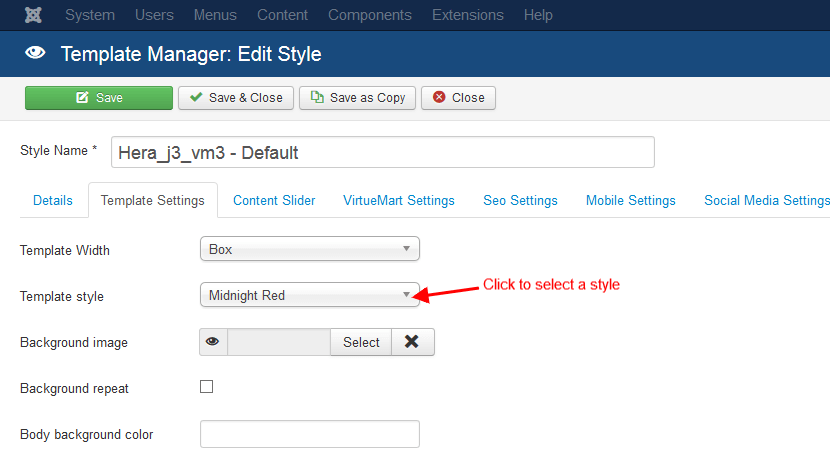
The Hera template has 7 color styles. If you would like to change the template style go to template configuration page, select the desired style form the "Template style" drop down list and save.
Template width
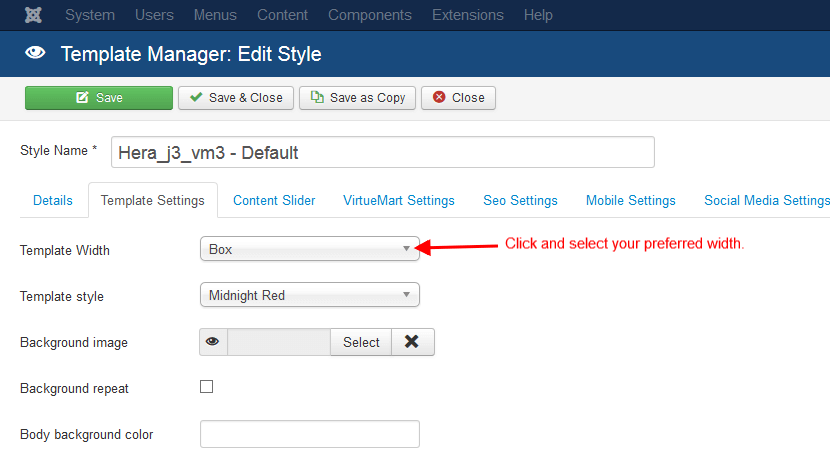
The template has two predefined template widths
- Box = 1170px centered
- Full Width = Full Screen
In order to set the width, go to template configuration page and select the desired width from the "Template Width" drop down list.
Template fonts
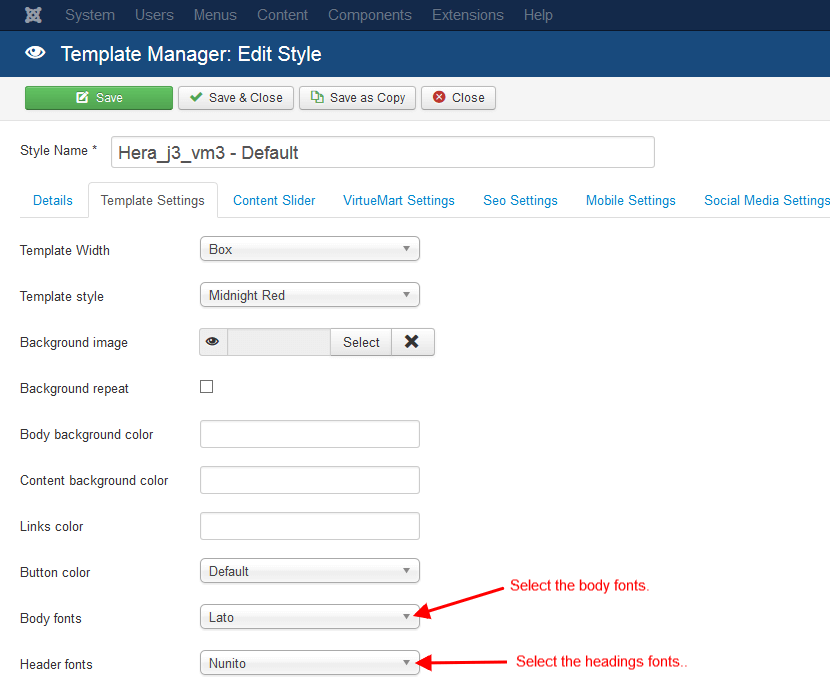
In order to set the desired fonts for the body and headings go to template configuration page , select the desired font family from the "Body fonts" and "Header fonts" drop down lists and save.
NOTICE
The template uses Google fonts, so it is important to check if the font family you selected has character sets for your language.
Disabling sticky menu
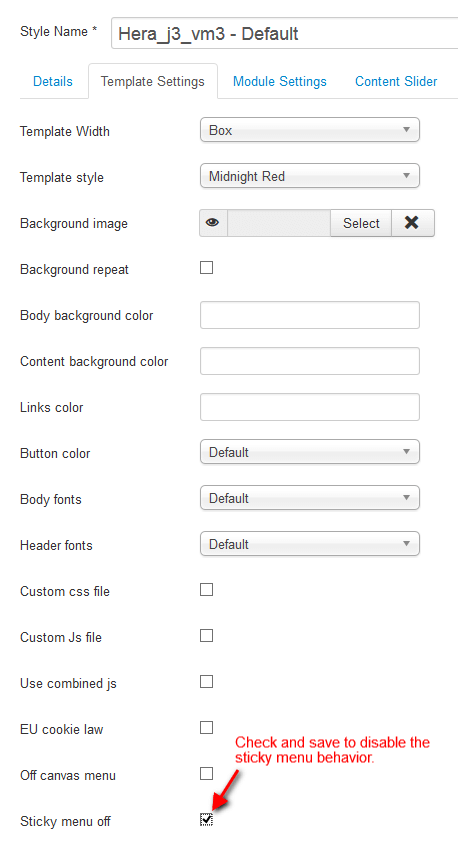
By default the main menu of the template has a sticky behavior and follow you while scrolling down the page. If you need to disable it, select the "Template Settings" tab on the template configuration page, check the "Sticky menu off" checkbox and save.
Content slider
- In "Content Slider" set the slider height to the height of your image banners i.e if your banner is 1170x400 pixels set it to 400, do not add px after the size number.
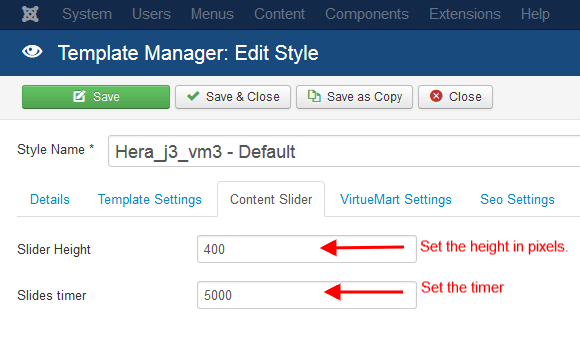
- Also set the time in milliseconds (i.e. 1000 for 1 second) so that the slider will wait before displaying the next image.
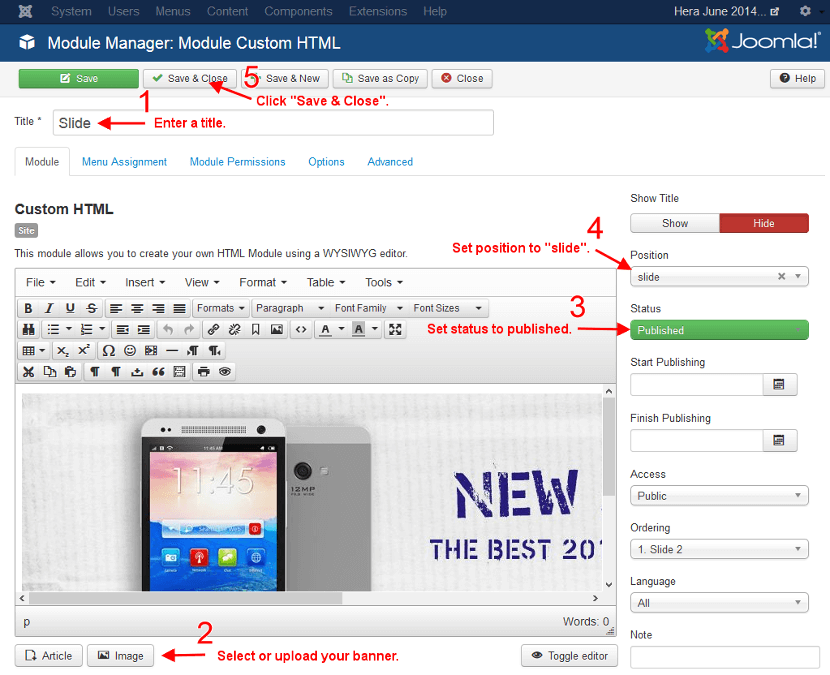
- Now create Custom HTML modules with the content you want to display in the slider and publish them in slide position.
NOTICE
It is important to use the right size images for your slides to have a nice looking slider. Please follow the instructions below:
- Always use exactly the same size images for your slides. If you have set the template width to "Box" make sure your images have 1170px width and of course the same height to avoid the "jumping" issue while the slider adjusts to the new image height. If you have set the template width to "Full Width" use images with width 1920px to make sure that the slide will cover the whole screen width on large screens.
- Make sure that you have compressed your images before using them for the slides so they wont slow your page load. My favorite tool for compressing jpeg images is Kraken.io , for png files you can also try TinyPNG online tool.
Body background color
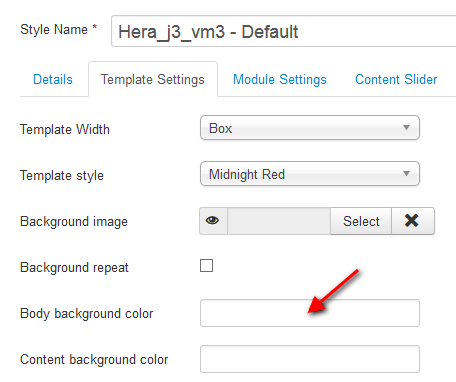
If you like to change the default body background color go to template configuration page, enter the hex value or the color name in the "Body background color" input field and save.
Use this tool to find the hex value of colors if you don't know it.
Template background image
The template has an option to set a custom background image. By deafult the background image will be centered, fixed and it will cover the full screen. There is also an option to repeat the image, see the image below.
- Go to template configuration page and click the "Select" button at the "Background image" option.
- The file up-loader window will open so you can select an image from the image directory or upload a new image from your computer.
- After selecting or uploading the desired image, save the new settings.
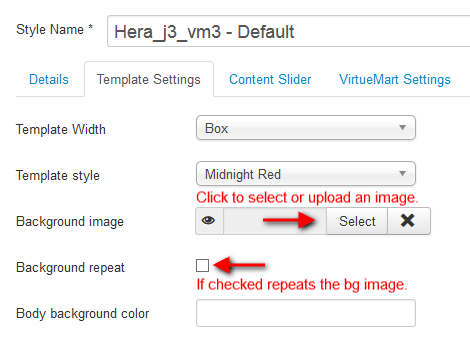
It is preferred to use a background image with size 1920x1080px so the background is clear on large screens. Make sure that you compress the image at 75-80% if you use jpg file, or if it is a png file use the tinypng.com service to drastically reduce the size without losing quality.
Content background color
If you like to change the default content background color, go to template configuration page, add the hex value or the color name in the "Content background color" input field and save.
Use this tool to find the hex value of colors if you don't know it.
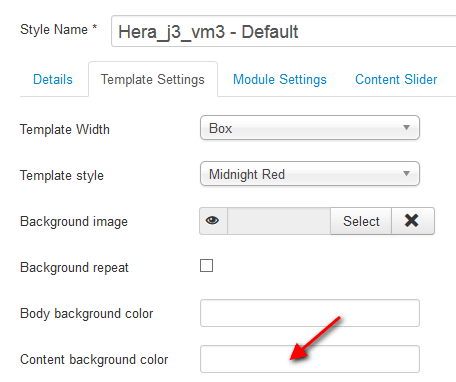
Links color
To change the default color of the links, go to template configuration page, enter the hex value or the color name in the "Links color" input field and save the settings.
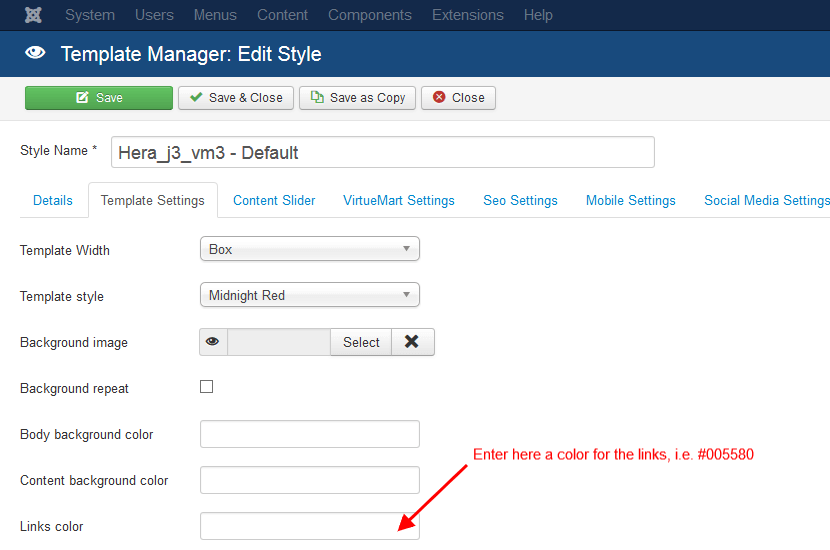
Use this tool to find the hex value of colors if you don't know it.
Custom css
The template has an option that allows you to add custom css code to easily change the styling of any element of the template without modifying the core template css files.
In the css folder of the template create a file and name it custom.css . In this file you can put your css code that will override the styling of the template. After saving your custom css code in the custom.css file you must go to template configuration page, check the "Custom css file" checkbox and save the setting so the template can use the custom.css file.
The custom css file is not overwritten by the template updates.
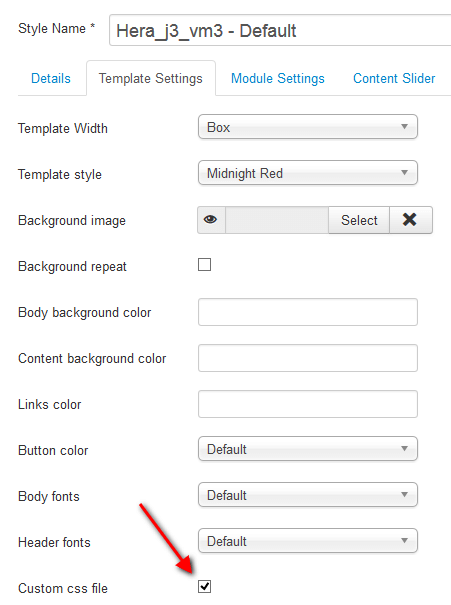
Since Hera version 3.5.0 (2.8.0 for J2.5) the option has moved to the "Custom code" tab.
Custom javascript
The template has an option that allows you to add custom js code without modifying the core template files.
In the js folder of the template you will find a file named custom.js. In that file you can put your javascript code. After saving your custom js code in the custom.js file you must go to template configuration page, check the "Custom js file" checkbox and save the setting so the template can use the custom.js file.
The custom.js file is not overwritten by the template updates.
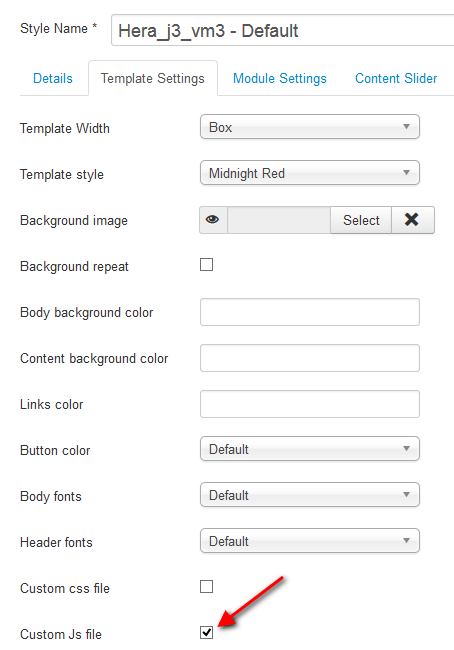
Since Hera version 3.5.0 (2.8.0 for J2.5) the option has moved to the Customization settings tab.
Module positions
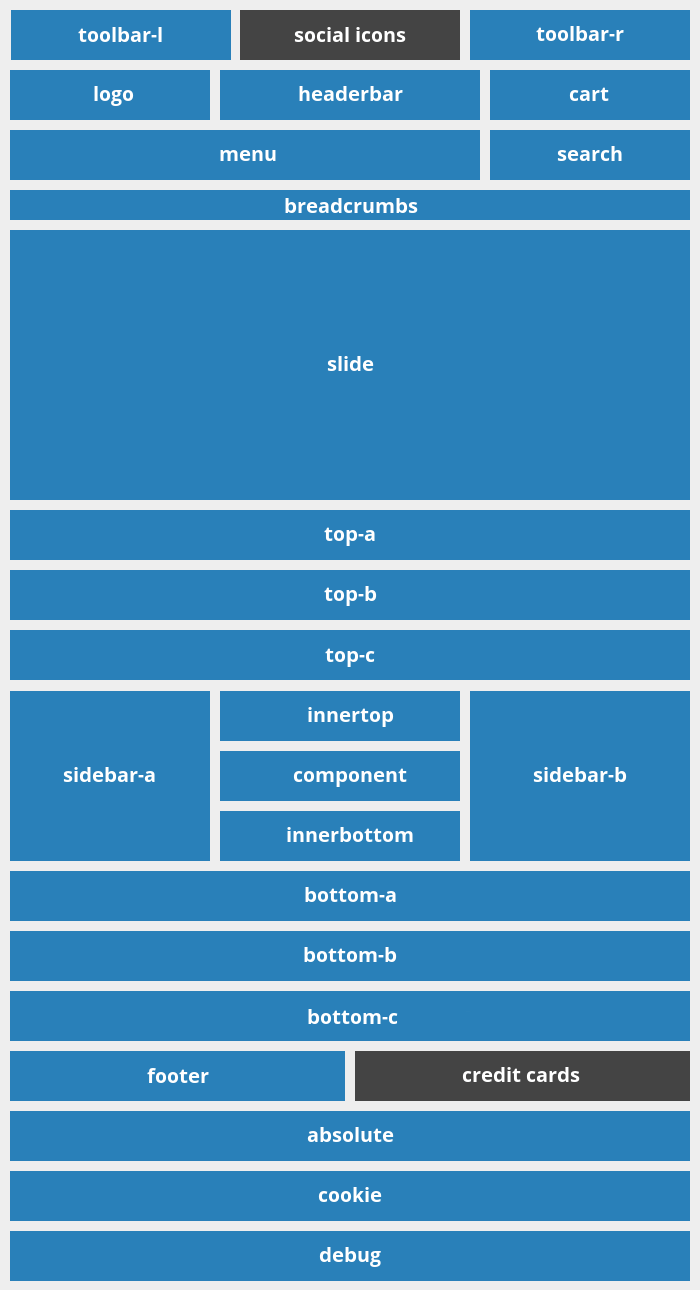
Pop up login
In order to enable the pop up login module :
- Create or use an existing Joomla! login module
- Publish it in toolbar-r module position
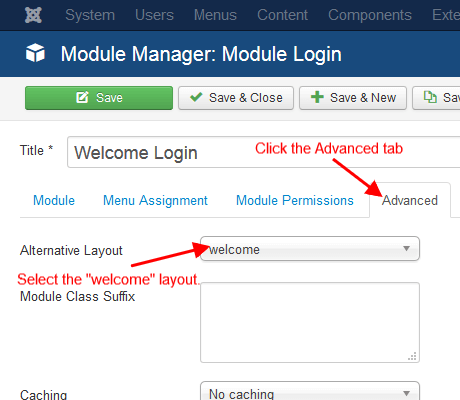
- At "Advanced options" of the module select "welcome" layout
Stacked modules
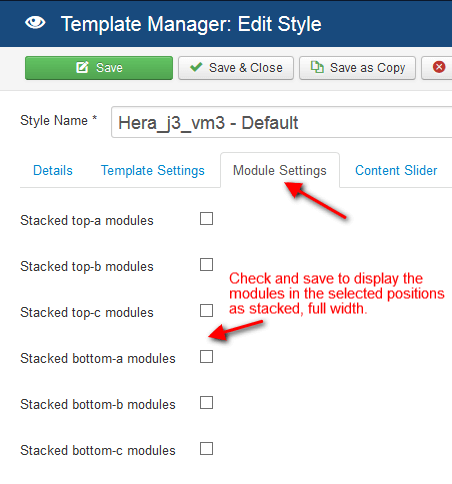
Since version 3.1.0 the template has options for certain module positions to display the published modules as stacked (full width) instead of floating.
Module positions that support stacked display
- top-a
- top-b
- top-c
- bottom-a
- bottom-b
- bottom-c
Disabling module positions
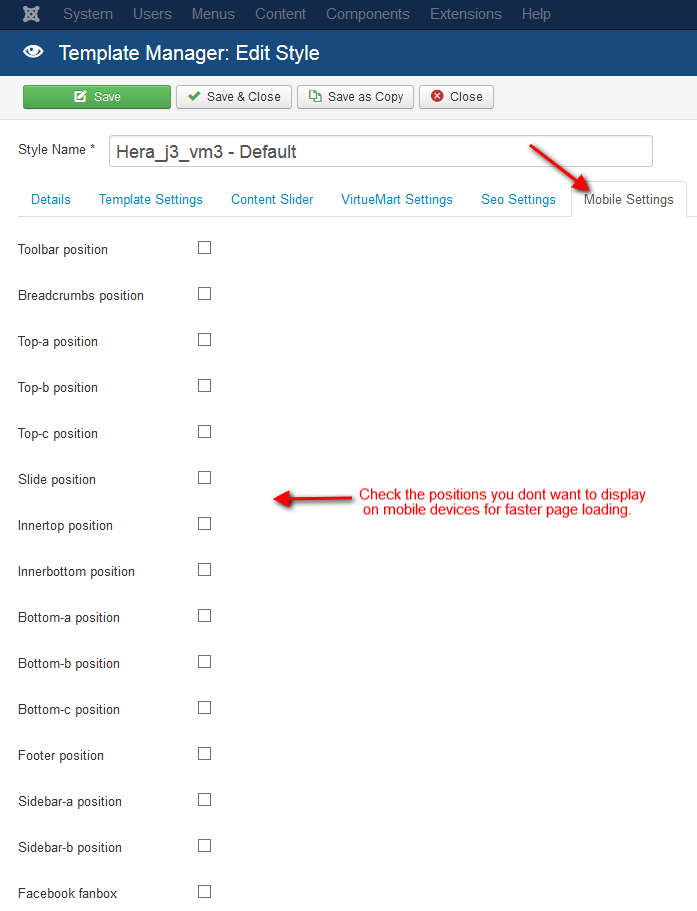
The template has the option to disable the display of certain module positions on mobile devices (smartphones & tablets). The advanced mobile detection feature can detect if the visitor is using a mobile device and depending on your settings does not load the module positions for faster page load.
All you have to do is check and save the module positions you dont want to display ("Mobile Settings" tab on the template configuration page).
Add to cart button color
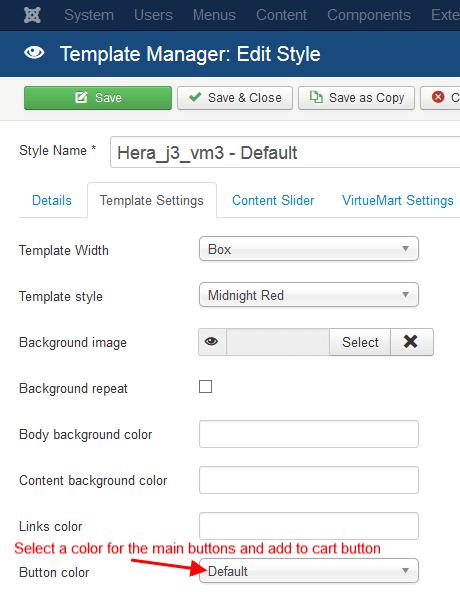
If you want to change the add to cart button color go to template configuration page, select a color option from the "Button color" drop down and save.
Hide add to cart button
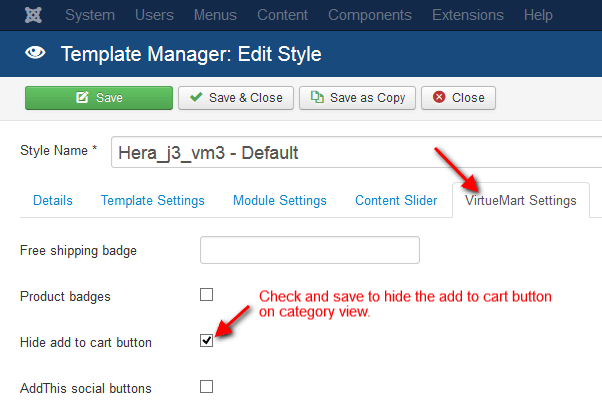
If you need to hide the "Add to cart" button on the categories pages and the VirtueMart front page there is an option in the "VirtueMart Settings" tab on the template configuration page.
Quantity buttons
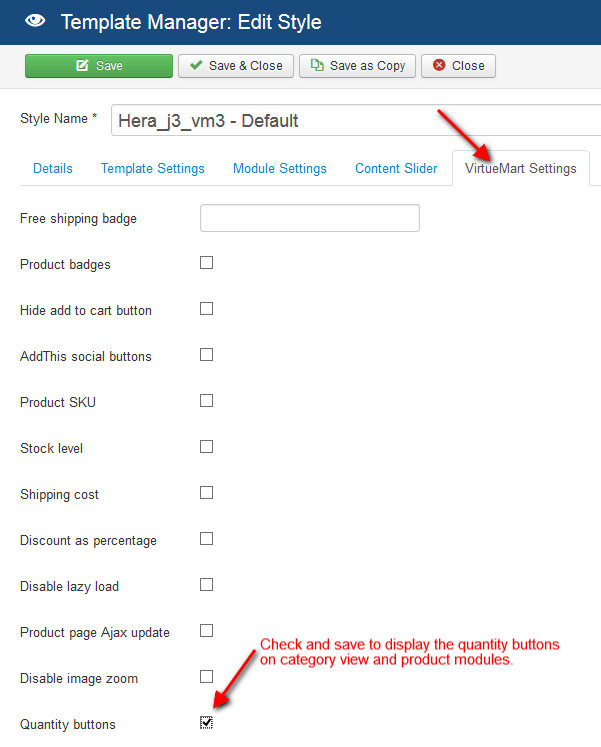
By default the quantity buttons are not displayed on the categories pages and product modules.
To enable them select the "VirtueMart Settings" tab on the template configuration page, check the "Quantity buttons" checkbox and save.
Category List , Grid layout
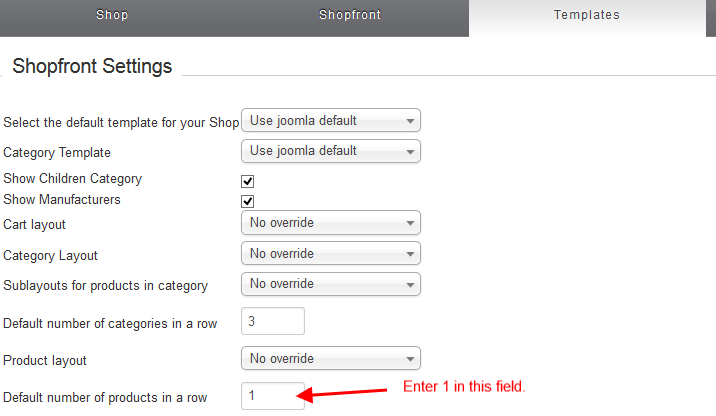
In order to change the category layout to list for all categories go to VirtueMart configuration -> select Templates Tab, change the value of "Default number of products in a row" to 1 and save the new settings.
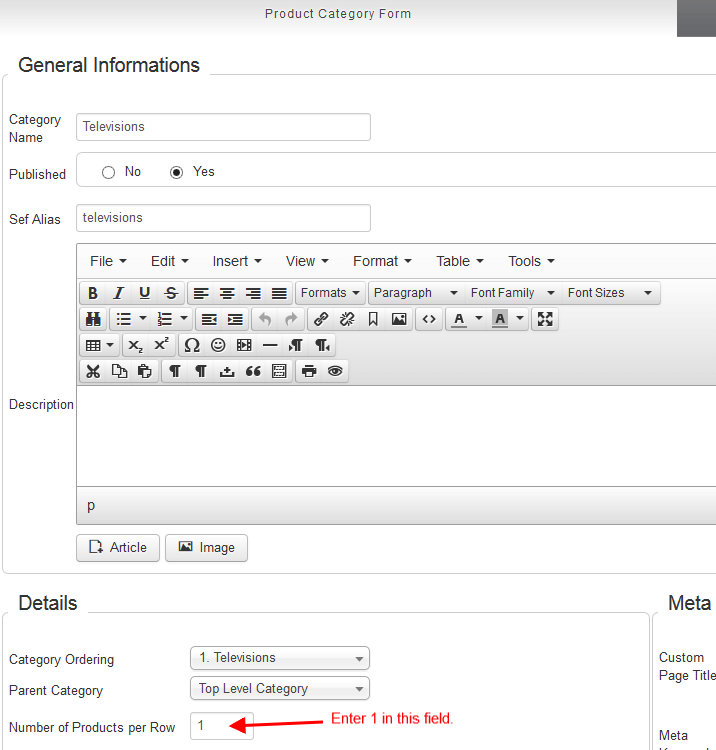
If you would like to change the layout to list only for a specific category, you must go to "Product Categories", select the category, change the value of "Number of Products per Row" to 1 and save the new settings.
Disable image zoom
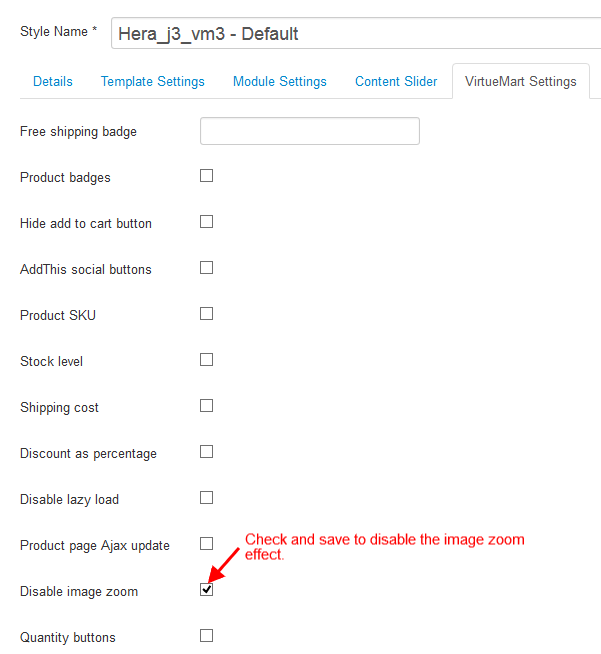
If you need to disable the product image zoom effect on the product page, the template has an option for this in the "VirtueMart Settings" tab on the template configuration page.
Disable lazy load
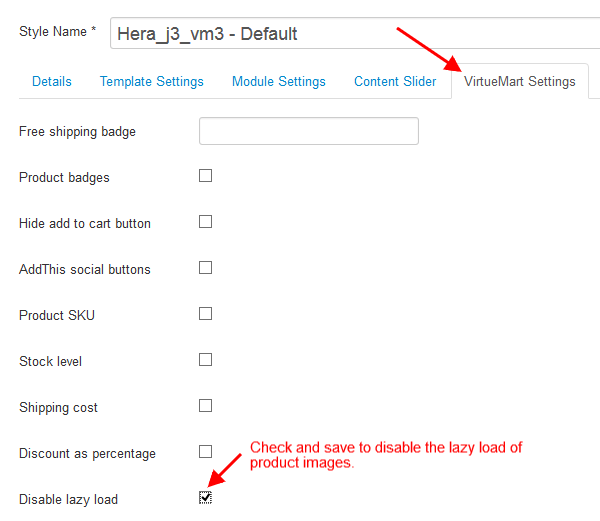
To disable the lazy loading of product images in categories, products module and the VirtueMart front page just check the "Disable lazy load" option in the "VirtueMart Settings" tab on the template configuration page.
Discount as percentage
The template has an option to display the discount as percentage.
Select the "VirtueMart Settings" tab on the template configuration page, check the "Discount as percentage" checkbox and save.
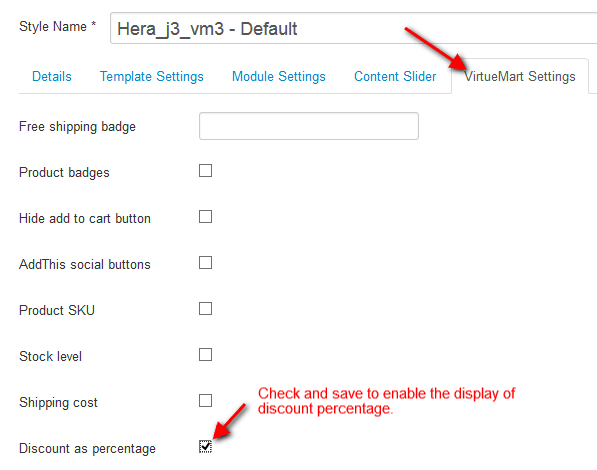
Free shipping badge
The template has an option to display a free shipping badge. In order to enable the badge you have to set the amount for free shipping in template configuration page under "Virtuemart Settings" -> "Free shipping badge" input field.
Any product with a sale price equal or higher than the amount you set will display the free shipping badge.

Product badges
The product badges work with virtuemart version 2.0.22 and higher. If you have an older version you have to upgrade first.
The settings below apply to most of the templates but some features might not be available.
New Products
To enable the badges for new products follow these steps:
- Go to virtuemart configuration.
- Select the "Shopfront" tab.
- At the "Core settings" area find the "Latest Products - Number of days to display" field and input the number of days you want a product to be considered as new.
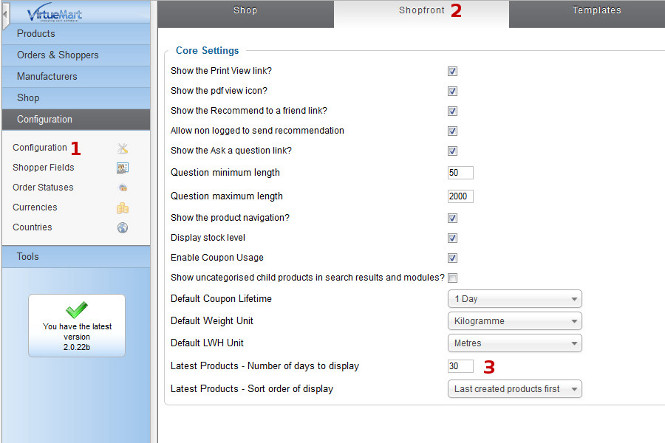
Featured Products
To enable the featured badge you must check the "On Featured" checkbox in the product edit page.

Discounted Products
For discounted products the badge is displayed automatically.
Out of stock Products
The out of stock badge is displayed automatically except if the option "Products Out of Stock are orderable, no special action" is selected in Virtuemart configuration.
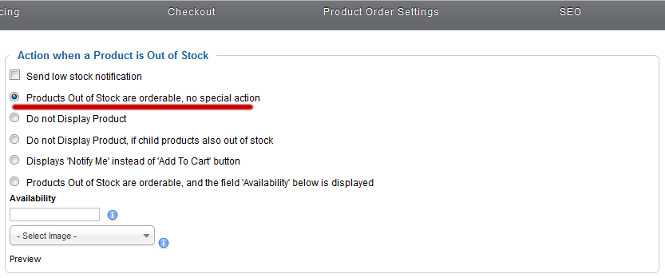
If your template has the option "Product badges" in "Virtuemart Settings" field you must check it also for the badges to display.
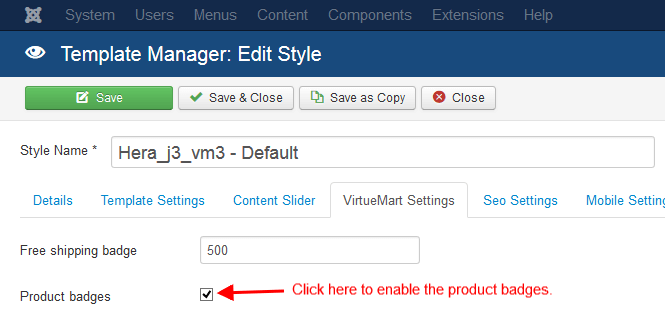
Text of product badges
You have two options to customize the displayed text
- Directly edit the language file that you can find in the language\en-GB folder inside the Joomla installation.
- Use the Language Overrides feature of Joomla!
If you need to translate the text to your language, copy the en-GB.tpl_hera_j3_vm3.ini in your language folder, rename it and edit the file.
Example for Greek language
- Copy the original file to "language\el-GR" folder of Joomla installation, rename the file to el-GR.tpl_hera_j3_vm3.ini.
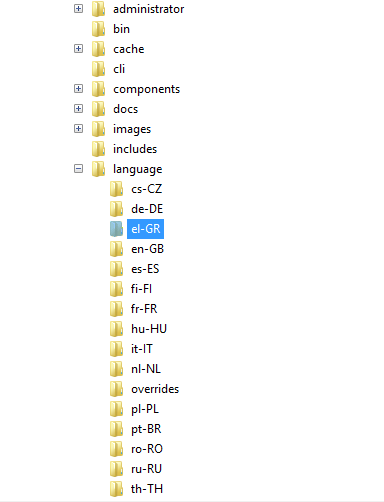
- Edit the text fields, for instance TPL_VM_NEW="New" to TPL_VM_NEW="Νέο" .
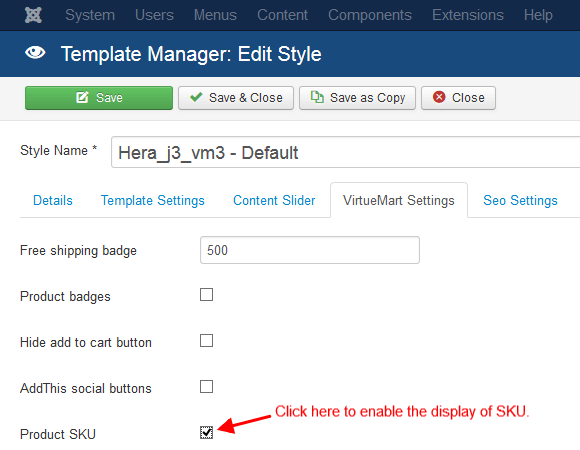
Product SKU
To display the product sku in product page and category page (if supported by the template) you must check the "Product SKU" check box in template configuration page under "Virtuemart Settings".
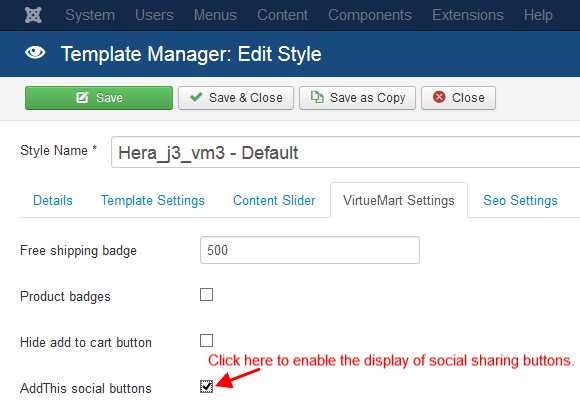
Social sharing buttons
To display the social sharing buttons in product pages you have to check the "AddThis social buttons" check box in template configuration page under "Virtuemart settings".
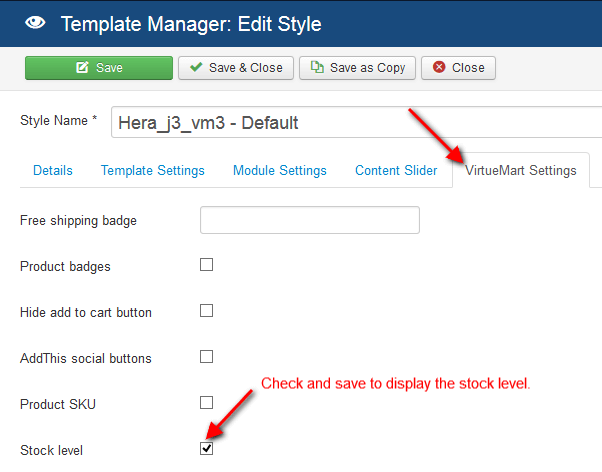
Stock level
The template has an option to display the stock level of the product instead of the "In stock" or "No stock" text.
Select the "VirtueMart Settings" tab on the template configuration page and check the "Stock level" checkbox and save.
Credit card icons
The template includes a set of credit card icon and also the option to upload and use your own icons, images
To display the credit card icons go to template configuration page and select the "Credit Card Icons" tab. From there you can either select the build in icons or upload your own.
![]()
The icons, images will display always on a reserved position at the bottom right part of the template.

EU cookie notice
The template has a simple build-in option for displaying a notice about the use of cookies in you website that is mandatory in EU.
In order to enable the EU cookie law notice first create a Custom HTML module with your desired message for the visitors and publish it on position cookie.

Also make sure that you assigned the module to display on all pages.

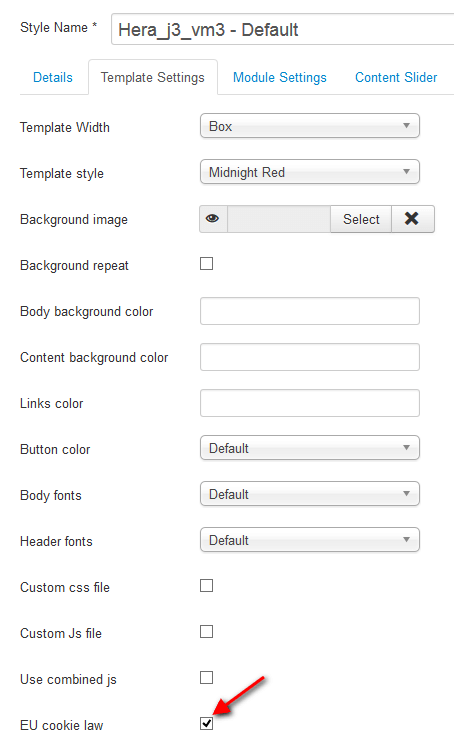
After the creation of the module go to template configuration page, check the "EU cookie law" check box and save the settings.
Social media
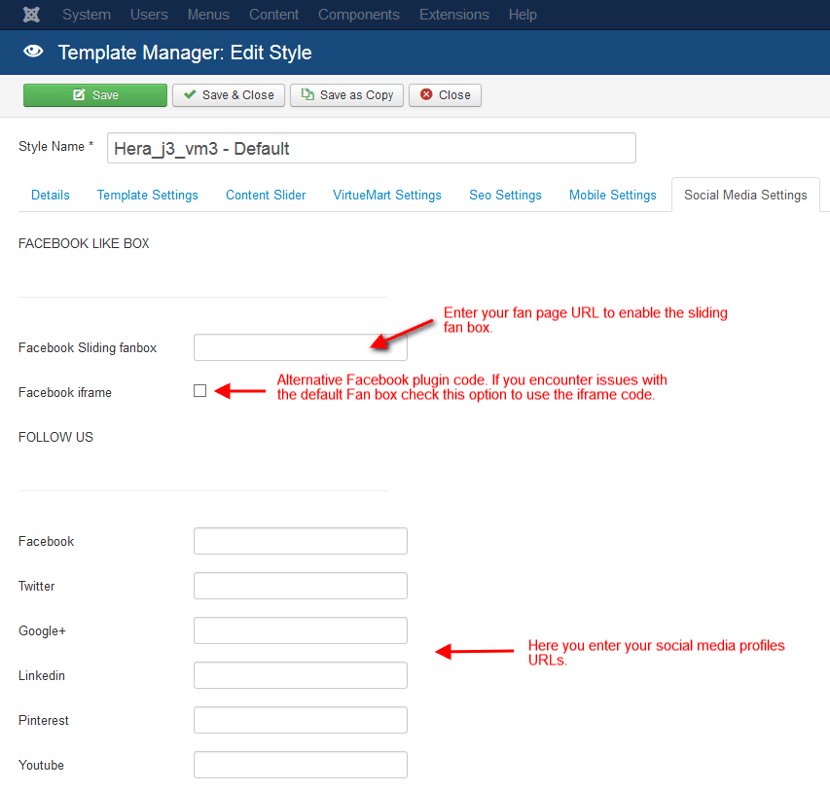
The template has two main social media features, the sliding fan box and the social media icons. The options for both are in the "Social Media Settings" tab on the template configuration page. Screenshot of the Social Media Settings tab in the template configuration page.
The social media icons are displayed in a reserved template position in the center of the toolbar section. Screenshot of the toolbar section of the template.

Google analytics code
To set up the Google analytics code first login to your Google analytics account and click the "Admin" link on the horizontal menu, in "PROPERTY" section click "Tracking Info" and then "Tracking code".
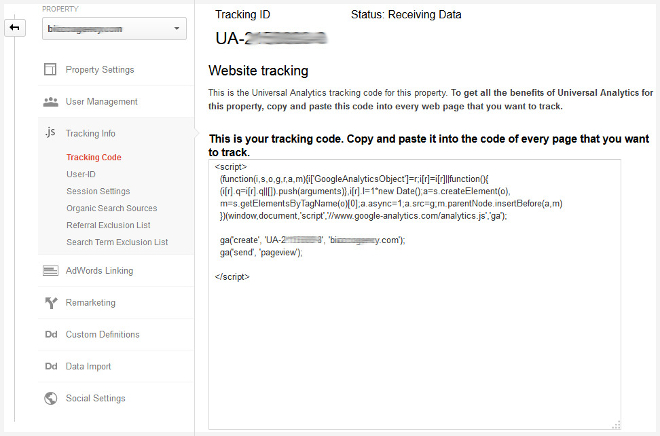
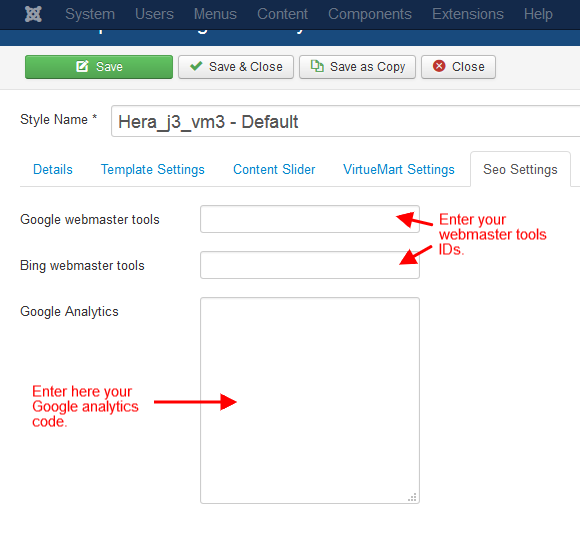
Copy the tracking code and go to template configuration page, paste the code in the "Google Analytics" text area under "Seo Settings" and save the settings.
Webmaster Tools
The template can generate the necessary meta tags for Bing and Google Webmasters owner verification after you enter your verification id in the following input fields in template configuration page under "Seo settings" :

To find your owner verification ID, go to verification options of webmasters tools in HTML tag option. The ID is the alphanumeric text without the double quotes in the content attribute of the tag :

